How to Get the Wabbajack in Skyrim: The Mind of Madness Walkthrough
Sheogorath's chaotic staff is one of Skyrim's most fun Daedric artifacts. Here's how to start The Mind of Madness, get into the Pelagius Wing and solve all three trials.
Some Daedric artifacts make you stronger. The Wabbajack makes every fight a coin toss – and that's exactly why players love it. One zap might set a bandit on fire, the next turns him into a chicken, and every so often your enemy simply bursts into a sweet roll. You get it from Sheogorath, the Daedric Prince of Madness, at the end of The Mind of Madness, one of the funniest quests in Skyrim.
The good news: there's no level requirement and no combat skill check, so you can do this as soon as you reach Solitude. Here's the full route, from the beggar who starts it to the three puzzles inside a dead emperor's head.
Quick Overview
| Quest | The Mind of Madness (Daedric quest) |
| Starts in | Solitude, Haafingar |
| Quest giver | Dervenin, a ranting beggar |
| Level needed | None – doable from level 1 |
| Reward | The Wabbajack, a set of fine clothes and a hat |
| Bonus | Lockpicking skill book Surfeit of Thieves |
Step-by-Step: Starting the Quest
- Find Dervenin in Solitude. He's a beggar wandering the city streets, complaining that his master has gone on "vacation." Innkeepers around Skyrim may also point you toward a madman in Solitude.
- Agree to help. Dervenin explains that his master went into the forbidden wing of the Blue Palace. That master turns out to be Sheogorath. Dervenin hands you Pelagius' Hip Bone, which you'll need to get in.
- Head into the Blue Palace. It's the royal residence of Solitude. The Pelagius Wing has been locked for ages, so you need the Pelagius Wing Key.
Getting the Pelagius Wing Key
There are two ways to get the key:
- Ask the maids. Talk to Erdi or Una, the palace servants (usually around the kitchen during the day). Bring up the Pelagius Wing and claim that Falk Firebeard asked you to look into it. It's an easy, hidden Speech check, and they'll hand the key over.
- Ask Falk Firebeard. The steward in the throne room will open the wing himself, but only after you've completed his side quest The Man Who Cried Wolf.
If the right dialogue option doesn't show up with the maids, a Fortify Persuasion potion or item can help you pass the check.
Entering Pelagius' Mind
Unlock the wing and walk through its dusty, cobwebbed halls. Pushing through the spider webs pulls you straight into the mind of Pelagius III, the infamously insane emperor.
You'll wake up in a misty glade dressed in fine clothes. Your weapons, spells and gear are gone, and the inventory, magic and map menus are locked. Sheogorath and Pelagius are sitting at a tea party. Pelagius wanders off, and Sheogorath agrees to come home – but only if you can "fix" Pelagius' mind and escape. To do that, he gives you the Wabbajack, which is equipped automatically.
Tip: if you're carrying more than 999 of a single item (usually arrows), drop some before entering – it's a known cause of the game freezing during the transition.
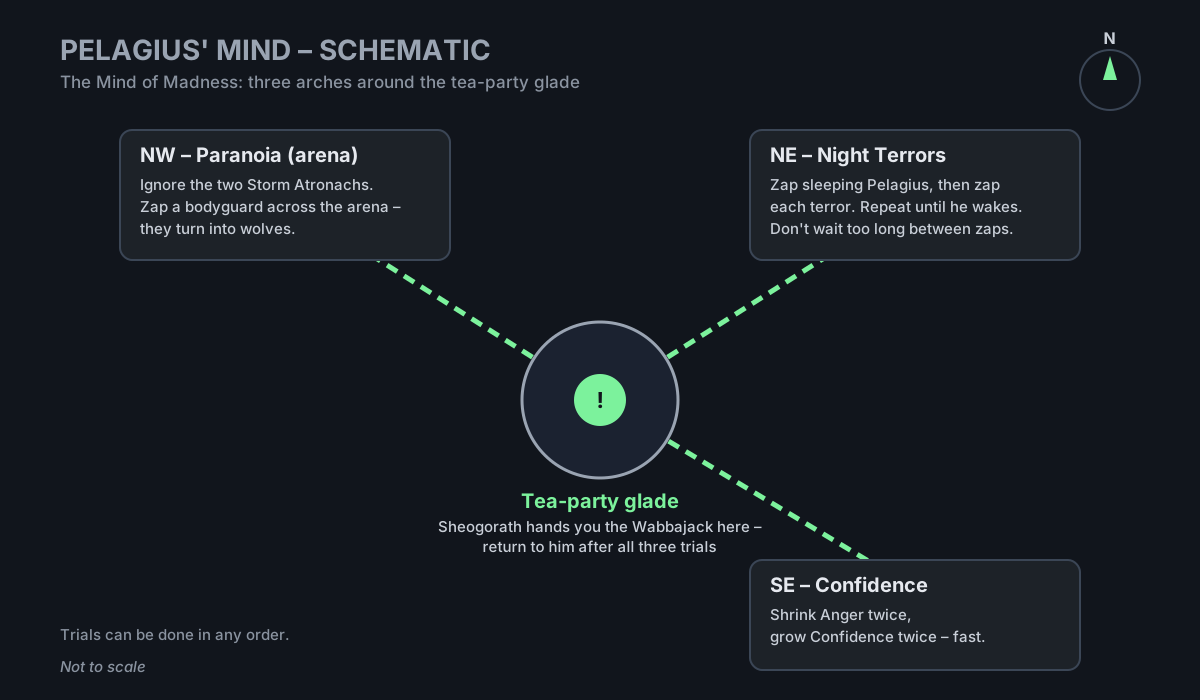
From the glade, three arches lead to three trials. You can do them in any order.
Trial 1 (Southeast): Confidence
Pelagius' Anger is beating up his tiny Confidence.
- Zap Anger with the Wabbajack to shrink him. Do it twice.
- Zap Confidence to make him grow. Do it twice.
- Be quick: every hit Confidence takes shrinks him again, and two ghostly Self Doubt figures show up to get in your way. Ignore them and keep zapping until Anger is tiny and Confidence is huge.
Trial 2 (Northeast): Night Terrors
Pelagius is asleep on a bed in the forest, haunted by nightmares. The trick is a loop:
- Zap Pelagius the Tormented to make a night terror appear.
- Zap the terror to turn it into something harmless. Don't attack it.
- Zap Pelagius again for the next terror, and repeat.
The terrors come in this order: a wolf (becomes a goat), a bandit chief (becomes a young Pelagius), a hagraven (becomes a maiden), a flame atronach (becomes a bonfire) and finally a dragon priest (becomes a treasure chest). Don't wait too long between zaps, or the sequence resets. When the last terror is gone, Pelagius wakes up. The chest can't be looted, so don't waste time on it.
Trial 3 (Northwest): Paranoia
Follow the path up to the fort-like arena. Two Storm Atronachs are fighting in the middle, and Sheogorath tells you to defeat the enemy.
- Don't zap the atronachs. They mirror each other, so the fight never ends.
- Look across the arena: Pelagius the Suspicious sits between two bodyguards.
- Zap one of the bodyguards. They both turn into wolves and take care of the man between them.
Escaping and Your Rewards
Return to Sheogorath in the glade and tell him the job is done. He summons Dervenin, heads back to the Shivering Isles and lets you keep the Wabbajack. You land back in the Pelagius Wing with all your gear, plus the fine clothes and hat.
Before you leave, keep going down the hall and take the stairs to the cellar at the end. The Lockpicking skill book Surfeit of Thieves sits there.
What the Wabbajack Actually Does
The version you use inside Pelagius' mind is a special copy with unlimited charges. The one you keep is the real artifact, and it casts a random effect with every shot. Possible outcomes include fire, frost and lightning damage, healing your target, making it invisible, absorbing its health, summoning a Dremora, or turning the target into a chicken, rabbit or mudcrab. The rarest results instantly kill the target and leave behind a sweet roll or a shower of gold coins.
A few things worth knowing:
- Bosses are predictable. On dragons, giants and essential characters, it always fires a damaging explosion instead of a random effect.
- Transformations wear off. An enemy turned into a chicken usually returns to normal, often at full health.
- It's a crime in town. Most effects are hostile, so zapping villagers can get you a bounty.
- It uses charges. The real staff drains charge like any other enchanted staff. Leveling Destruction lowers the cost, and at 100 Destruction it costs nothing to cast.
Common Mistakes
- Shooting the Storm Atronachs in the Paranoia trial. It goes nowhere – aim for the bodyguards.
- Taking too long in Night Terrors. Keep the rhythm: Pelagius, terror, Pelagius, terror.
- Missing the Speech option with Erdi or Una. Finish The Man Who Cried Wolf or boost your Speech instead.
- Leaving without the skill book. It's a free Lockpicking point waiting in the cellar.
The Mind of Madness is short, silly and gives you one of the most entertaining weapons in the game. It won't replace your main build, but the next time a dragon priest shows up, a lucky zap might end the fight in one shot.
Sources
This article was written by AI (Claude) and checked against the sources above. Games are updated regularly, so details may change.